RAID 666

Some days ago, a friend of mine held a speech about partitioning in linux. During the event, he introduced the audience to the wonders of raid levels. Just when he talked about “raid 6+0”, something clicked. I had to try it.
So here it is: RAID 6+6+6.
Not because it makes sense, but FTW.
the goal
(An healthy) RAID-6 is composed, at least, by 4 drives, in which the two parity blocks are striped across the drives.
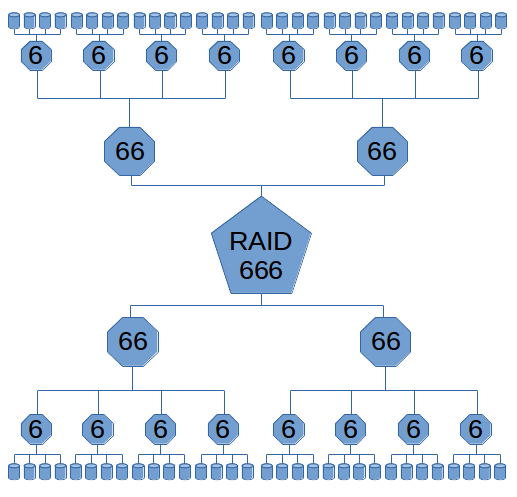
We need 3 layers: a RAID-6 composed of four RAID-6 devices, each composed of four hard drives.
This adds up to 64 drives. Plus a system drive.
I just want the RAID device to be up and synced, I don’t bother about performances.
setup
I don’t have 64 drives available, so I opted for a virtual machine.
I opened VirtualBox and created a Debian 9 VM, with one hd. Usual installation, VM reboot, login and ssh-copy-id.
Now it’s time to add a lot of disks, but adding manually via the GUI is time-consuming, so let’s switch to the command line.
After some trial and error, I discovered that in VirtualBox you cannot have 2 storage controllers of the same type (in this case, it’s impossible to have two or more sata controllers) and the default sata controller can handle only 20 disks.
So the first thing to do is adding a SAS controller:
VBoxManage storagectl raid666 --name "SAS" \
  --add sas --controller LSILogicSAS --portcount 65 \
  --hostiocache on --bootable off
“raid666” is the name of the virtual machine. Then we need a bunch of .VDI files (one for each disk):
for n in $(seq 1 64) ; do
  VBoxManage createmedium disk --filename hd$n.vdi --size 10240
done
As you can see, they’re all 10GB each. I numbered from 1 because 0 is the system drive. Now the disks are going to be added to the SAS controller
for n in $(seq 1 64) ; do
  VBoxManage storageattach raid666 --storagectl "SAS" \
    --type hdd --port $n --medium hd$n.vdi
done
Ok, time to boot.
building the raid of the beast
If you never asked yourself “what happens if I add 25 drives to a linux system? How will it name it?”, you’re going to learn something today.
The system drive is /dev/sda, as usual. All other disks are named from /dev/sdb, even if they’re on a different controller. They’re from /dev/sdb to /dev/sdz, then from /dev/sdaa to /dev/sdaz and finally from /dev/sdba to /dev/sdbm. Now you know it. You’re welcome.
The bottom layer of the raid is composed by sixteen RAID-6, each made from four 10GB disks. This gives 20GB for each RAID-6. Here’s how to make it:
mdadm --create /dev/md0 --level 6 --raid-devices 4 --run /dev/sd{b,c,d,e}
mdadm --create /dev/md1 --level 6 --raid-devices 4 --run /dev/sd{f,g,h,i}
mdadm --create /dev/md2 --level 6 --raid-devices 4 --run /dev/sd{j,k,l,m}
mdadm --create /dev/md3 --level 6 --raid-devices 4 --run /dev/sd{n,o,p,q}
mdadm --create /dev/md4 --level 6 --raid-devices 4 --run /dev/sd{r,s,t,u}
mdadm --create /dev/md5 --level 6 --raid-devices 4 --run /dev/sd{v,w,x,y}
mdadm --create /dev/md6 --level 6 --raid-devices 4 --run /dev/sd{z,aa,ab,ac}
mdadm --create /dev/md7 --level 6 --raid-devices 4 --run /dev/sd{ad,ae,af,ag}
mdadm --create /dev/md8 --level 6 --raid-devices 4 --run /dev/sd{ah,ai,aj,ak}
mdadm --create /dev/md9 --level 6 --raid-devices 4 --run /dev/sd{al,am,an,ao}
mdadm --create /dev/md10 --level 6 --raid-devices 4 --run /dev/sd{ap,aq,ar,as}
mdadm --create /dev/md11 --level 6 --raid-devices 4 --run /dev/sd{at,au,av,aw}
mdadm --create /dev/md12 --level 6 --raid-devices 4 --run /dev/sd{ax,ay,az,ba}
mdadm --create /dev/md13 --level 6 --raid-devices 4 --run /dev/sd{bb,bc,bd,be}
mdadm --create /dev/md14 --level 6 --raid-devices 4 --run /dev/sd{bf,bg,bh,bi}
mdadm --create /dev/md15 --level 6 --raid-devices 4 --run /dev/sd{bj,bk,bl,bm}
The middle layer is composed by four RAID-6, each made from four 20GB md devices made before. This gives 40GB for each RAID-6. Here’s how to make it:
mdadm --create /dev/md16 --level 6 --raid-devices 4 --run /dev/md{0,1,2,3}
mdadm --create /dev/md17 --level 6 --raid-devices 4 --run /dev/md{4,5,6,7}
mdadm --create /dev/md18 --level 6 --raid-devices 4 --run /dev/md{8,9,10,11}
mdadm --create /dev/md19 --level 6 --raid-devices 4 --run /dev/md{12,13,14,15}
The last layer is a RAID-6 of the four md devices on the middle level, so 80GB of ultra-redundant data.
mdadm --create /dev/md20 --level 6 --raid-devices 4 --run /dev/md{16,17,18,19}how it is
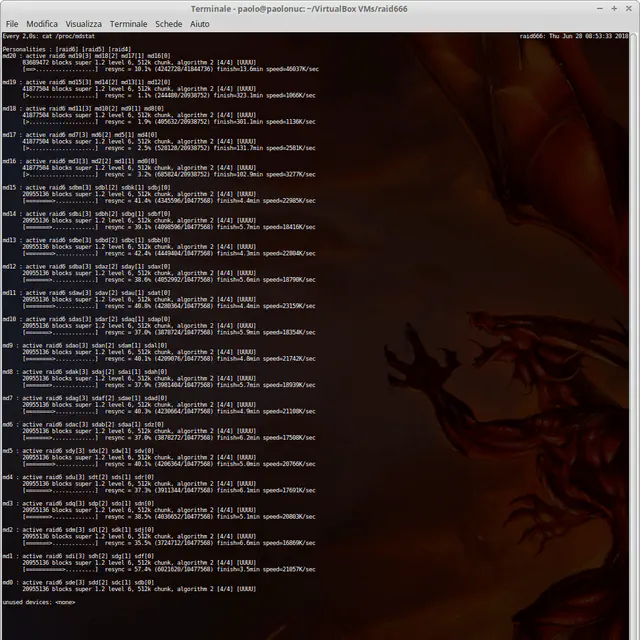
If you run all the above mdadm commands in one go, like I did, the VM will cry. The host running VirtualBox isn’t really slow (4.2 GHz i7 7700K, with SSD and all the things) but the system load on the VM… 100% CPU load coming from no process, and when you take a look on what the raid subsystem is doing, this happens:

For some reason, the bottom layer got synced first, then the top RAID-6 and finally the middle layer.
I created a filesystem on this thing, just to be sure that you can use it in the real world: all the 80GB of the RAID-666 are usable, time to shutdown.
conclusions
At the end, we took 64 disks, 10GB each, for a total of 640GB and combined them to get an ultra-redundant 80GB device. It’s like spending 8 times the money, not exactly cost-effective.
But you can remove 32 disks from the system and be sure that everything works. In fact, if you remove the right disks, this abomination can survive even without 56 disks.
I know, it doesn’t make sense. There’s no need of a third layer in any raid configuration.
Usually you have RAID-n or RAID-n+0 because the meaning of a second raid layer (the +0) is to squeeze out more speed.
But it’s fun to see a linux system working hard to accomplish a useless task.
Thanks to linux md for making this possible.